Tales From the Support Queue: A How-To Guide for Fixing Certificate Revocation Issues
Digital Signing Certificate revocation is a common, transparent, and effective mechanism for application developers to help ensure users aren’t running unsupported or insecure software. It’s a demonstrably Good Thing. There’s one scenario however, where certificates can be a hassle, especially when you’re in a hurry. Certificate revocations or missing certificates sometimes get in the way of a software upgrade or new installation, especially for security-related upgrades. In this post we’ll learn why it happens, how to identify a certificate issue blocking an upgrade, and how to manually install signing certificates step-by-step.
This guide may not be Saturday morning coffee on the porch browsing, but hopefully it’s useful in a moment you need it. It may also seem familiar from other upgrade troubleshooting you’ve done, where you’ve found you need to upgrade certificates for Citrix, Microsoft, or Atlassian.
Technical Anything Step 1: Start With a Real-World Example
In this example, we’ll use the SolarWinds incident response to the SUNBURST cyberattack and the downline effects on existing installed binaries and upgrade packages when their signing certificates are revoked. (For more background on this revocation and required upgrades, see SolarWinds New Digital Code-Signing Certificate.) Another reason this is a great example is the SolarWinds certificate revocation for the affected Orion Platform software versions also requires re-signing other software and tools not affected by SUNBURST or SUPERNOVA, but which are signed with the same, compromised digital certificate. Last, SolarWinds will revoke its affected digital code-signing certificate March 8, 2021. Upgrades before that time are less likely to encounter a certificate issue.
Technical Anything Step 2: Show the Easy Method First
Generally, most SolarWinds Orion admins will be able to use the built-in web install updater under the top-level Orion “Settings” menu, “My Orion Deployment,” “Upgrades & Evaluations” tab.
- On the bottom left of the page, click “Make A Plan” to run the pre-upgrade checks and verify you’re ready to proceed
- Click “Pre-Stage Files” to make sure the upgrade binaries are where they need to be. For example, if you’re using remote pollers or high availability features, the installer will pre-position what it needs to those systems as well to make the upgrade faster in large environments.
- When everything is ready, click “Upgrade or Eval Now,” and the upgrade will begin.
Here’s the page you’ll use, found at https://{your Orion host or IP}/ui/ha/deployment/update.
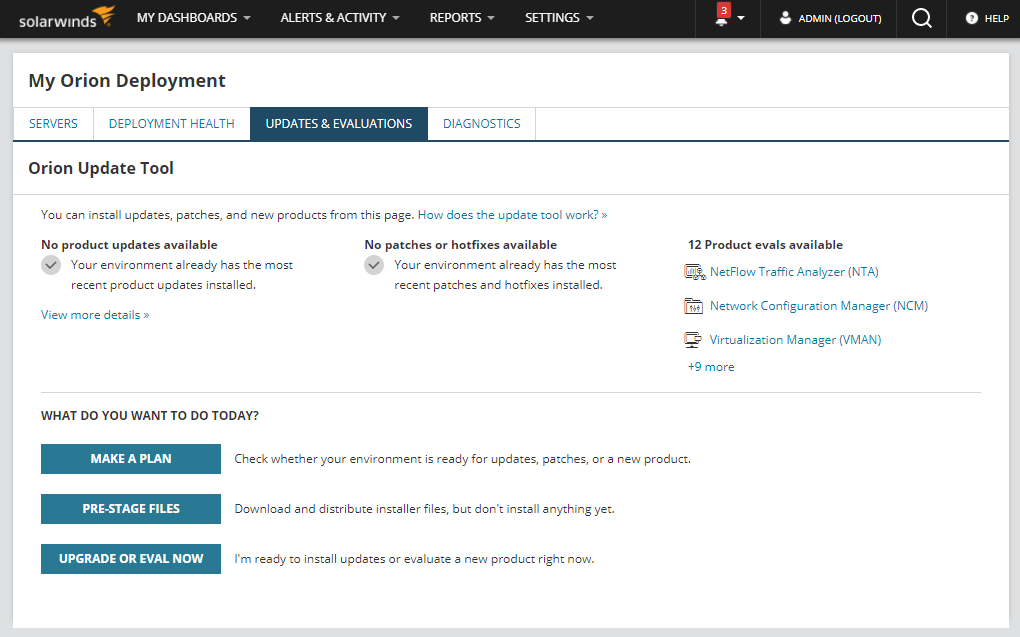
If your system needs updates, you’ll see an update is available and the wizard will take you through the process step by step.
However, if you encounter a message like “the product cannot be found on the server,” or you see invalid certificate or cryptography errors, it may be related to a revoked certificate on the server, especially after the March 8 revocation date. Fortunately, before we review how to manually import the new digital signing certificate into Windows, there’s another option. Orion admins can use the offline installer with all the required bits in in the .iso.
For any binary file, Windows or antivirus software attempts to validate existing signing certificates before loading the file into memory or streaming it into a process. Again, that’s a very Good Thing and it’s working as it should. Before March 8, Microsoft and other security tools began flagging an affected binary as intended. However, which process raised a flag and how quarantined files are handled may differ from server to server. It’s also possible the main Orion poller might be up to date, but a very remote poller running in a far-away VM might not be. (The installer should identify this in advance.) But once SolarWinds revokes its previous software signing certificate, other non-Orion Platform products may also require upgrading to binaries with the new signing certificate. Check the New Digital Certificate Table for the complete list of what will require upgrades.
Upgrade Fix #2: The Old-School, Almost as Easy Way
Before the web-based installer in the Orion Platform, users downloaded update packages from the support portal and ran them locally. This can still be a good option if the online update “Make a Plan” pre-flight finds missing components. There are few reasons that could happen, but files quarantined by the OS or antivirus could be one if a signing certificate revocation is unplanned. The offline installer is just as easy to use as the web version, with all the same preflight and pre-staging tests. The difference is it has all the files needed in advance. This is also how offline, air-gapped networks perform installs and upgrades.
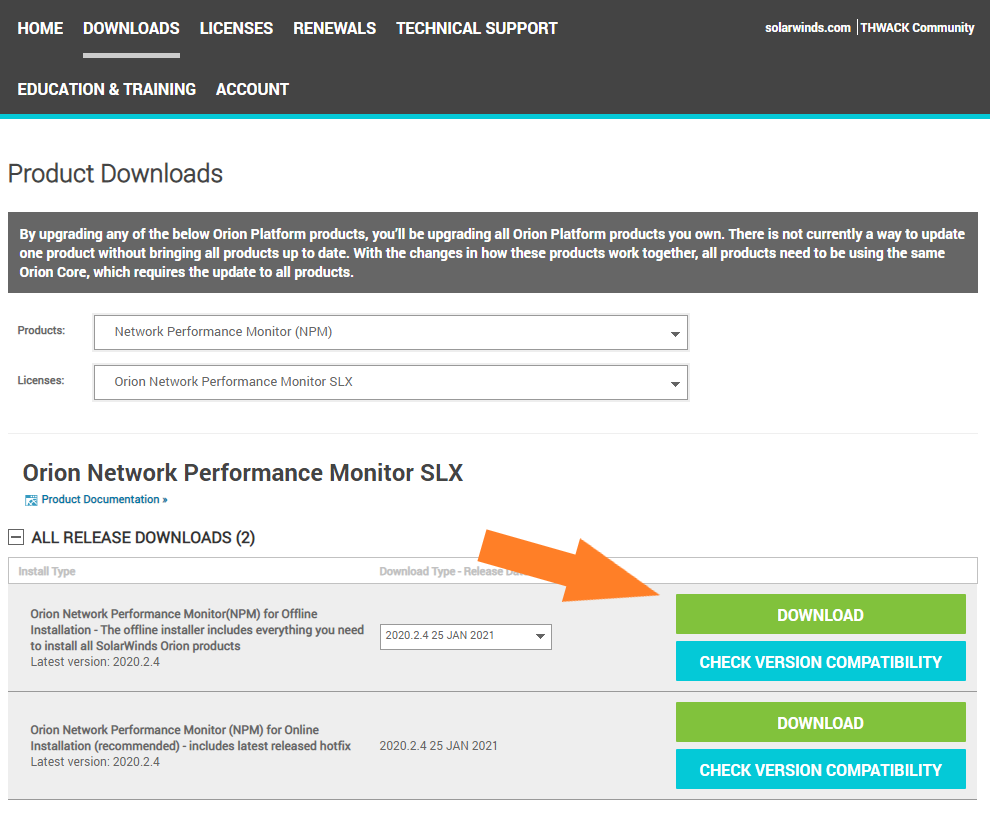
- Start by downloading the recommended installer for your environment from your customer portal page at https://customerportal.solarwinds.com/.
- Expand the top-level “Downloads” menu, and then click “Download a Product.”
- Under Products, select the Orion Platform product and license you want to base the upgrade on. Generally, this will be the most commonly used module of your system, like Network Performance Monitor (NPM) or Server & Application Monitor (SAM). You won’t need to worry about specific module versions; the installer will figure that out for you.
- The portal will display your available versions, and you’ll want to select the “Offline installation” download.
- Most importantly, make sure you download version 2020.2.4 (released January 25, 2021) or later, unless otherwise directed by Support or SUNBURST documentation. Incorrect versions may not install, or you may need to repeat this process if you do not upgrade to software versions re-signed with the new certificate.
Your Customer Portal download page should look something like this, but with the license you select. In this case, it’s my unlimited element NPM SLX version:
You’ll know it’s the correct download because it will be a 3.9G .iso file instead of the online installer’s 92M .exe:
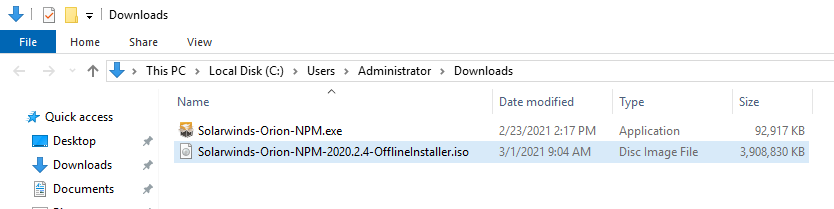
Mount offline installer .iso as a drive, open the folder and run SolarWinds.Orion.Installer.exe. The installation should proceed normally.
At this point most administrators will be successfully upgraded, online, and monitoring their infrastructure as usual, but with the latest security fixes applied. Additionally, subsequent upgrades should work normally from the web-based installer in the Orion Platform’s “My Orion Deployment” web interface.
What If You Still See Certificate Errors Or Want to Verify the New Signing Certificate Beforehand?
Beyond general curiosity about how signing certificate trees work, checking the certificate tree before installing software can save troubleshooting time later. This also applies for upgrades to just about any vendor’s software. Let’s take a moment to walk though how to verify not just a vendor certificate, but the intermediate and root certificates forming valid signature chains. Even better, we’ll discover how to manually update missing or replaced certificates on Windows. Again, we’ll use the SolarWinds upgrade example and the DigiCert DigiCertAssuredIDRootCA.crt tree from which it descends. Note: this process may be required for offline or air-gapped networks.
First, a quick primer on signing certificates. Rather than certificate authorities creating unique certificates for each signed entity, they’re based on “trees.” The “root” certificate is the one a certificate authority “stands on.” They are relatively rare and carefully guarded by the root authority. In this example the root is used to prove DigiCert is DigiCert. The root certificate is then used to digitally “sign” other entities, which can then trace back their certificate up the tree back to root. Software developers then sign code based on these root or intermediate certificates, again easily validating each certificate in-turn, back to root.
The benefits are that the root issuer doesn’t need to track the details of every end-use signature, and every OS or application doesn’t need to install an enormous catalog of every possible certificate for every application in existence. It also allows for revocation anywhere along the certificate chain. Let’s look at how this works in the SolarWinds code re-signing example, and how to manually update missing certificates in a certificate chain, if required. In addition to the SolarWinds Orion Platform upgrade example, this process is essentially the same for any program or other signed file on the system.
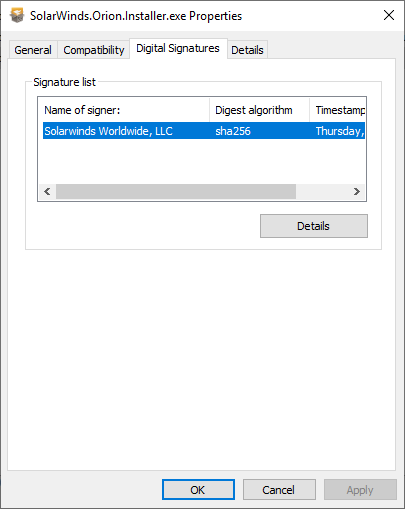
You can view a certificate and check the status of all certificates in its chain simply by right-clicking a file and opening its properties. In this case, let’s use the SolarWinds.Orion.Installer.exe file. Right-click your downloaded offline installer .iso, mount it as a volume, and right-click the installer .exe.

Next, click “Properties” to open the File Properties dialog. Then, click the “Digital Signatures” tab to view the signatures list:
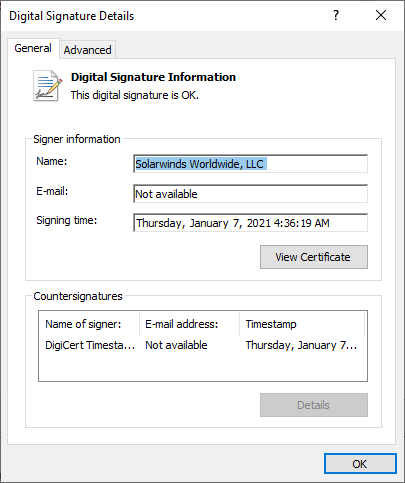
Next, select the “SolarWinds Worldwide, LLC signature” and “Details” to open the Digital Signature Details dialog:
Last, to get to the actual certificate included in the executable, click “View Certificate” top open the Certificate viewer:
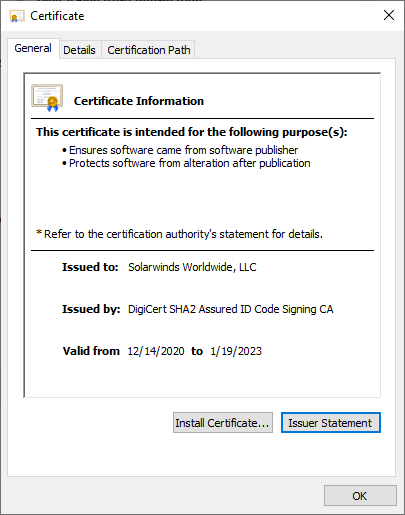
Here you’ll see the specifics of the certificate used to sign the SolarWinds installer for the upgrade. In this case, the Offline NPM installer has been signed based on a secure key from DigiCert. “Ah,” you might say. “But what if it requires a tree of other certificates? How can I confirm required root certificates are also present on the system and valid?” That’s a great question and one with an easy answer. Click the “Certification Path” tab to see the whole tree.
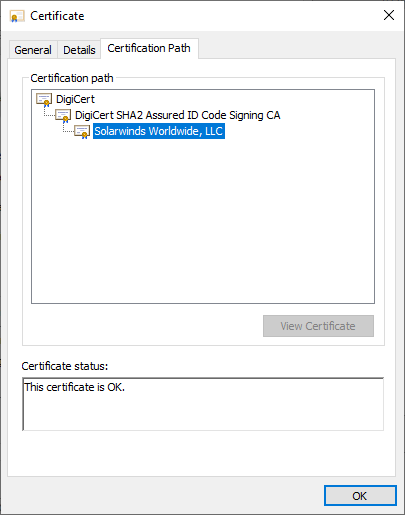
In this example we see three certificates, each signed based on the verified certificate below.
- The DigiCert root – identifies the issuing root organization
- An intermediate DigiCert Assured ID Signing certificate – used to identify a certification unit of DigiCert
- SolarWinds signing certificate, issued by DigiCert to SolarWinds
In this example there are no errors, and everything should be ready to go. If, however, you see errors in the certificate path, there’s a way to easily fix them and ensure the upgrade installer has what it needs.
Signing Certificate Pre-Flight and Optional Manual Certificate Install Process
The Certification Path view is a one-stop shop to view not only the certificate of a file, but also the validity and availability of the full signing chain. Certificates with issues will be marked with a red “X” on their icons, and when clicked, the “Certificate status” field will display the details. In this example where an upgrade might need a root certificate installed first, the message will be “This certificate cannot be verified up to a trusted certification authority.”
Fortunately, you only need a couple of minutes to install a missing certificate and get on with your day.
Download the Missing Certificate
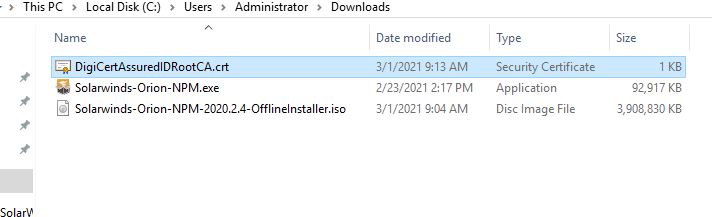
First, you’ll need a copy of the missing certificate. In the SolarWinds example, it’s DigiCertAssuredIDRootCA.crt and can be found and verified on DigiCert’s Root Certificate Page. You can see all the details for issued certificates, their status, and the details to independently verify each. Download DigiCertAssuredIDRootCA.crt and open its file location in Explorer. The direct download is https://cacerts.digicert.com/DigiCertAssuredIDRootCA.crt
To inspect and install the DigiCert root certificate, double click the DigiCert .crt file to open it in the Certificate viewer.

Here you can verify the cert is valid, who issued it, as well as its validity dates and status. As before, if this were an intermediate or other certificate in a tree, you’d see that information in the “Certification Path” tab. In this case, it’s a single certificate, so you don’t need anything else.
Now for the easy part, installing the certificate to Windows. With the .crt in hand and the required admin privileges for the server OS, you’ll install the certificate right from this dialog. There are two places it should be installed to make sure it can be seen by the OS and third-party applications like SolarWinds. You’ll need to add it to both “Trusted Root Certification Authorities” and “Third-Party Root Certification Authorities.” Spoiler: It’s way easier than getting Chrome to trust a self-signed certificate though an NGINX reverse-proxy.
First, click “Install certificate” on the Certificate viewer to open the Windows Certificate Import wizard:
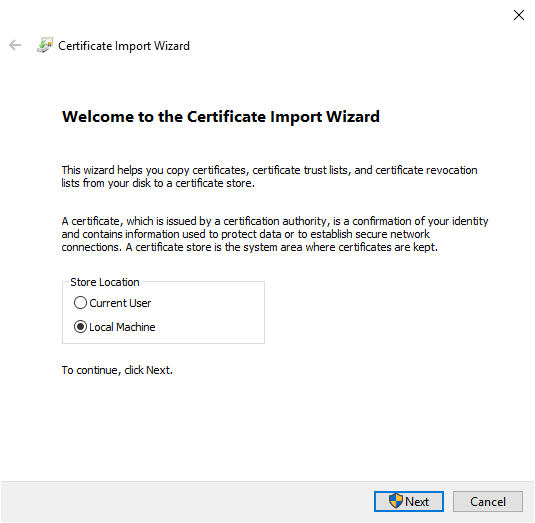
Most server applications run as services, not users, so click “Local Machine” under store location, and then click “Next” to select which certificate stores should have the certificate installed.
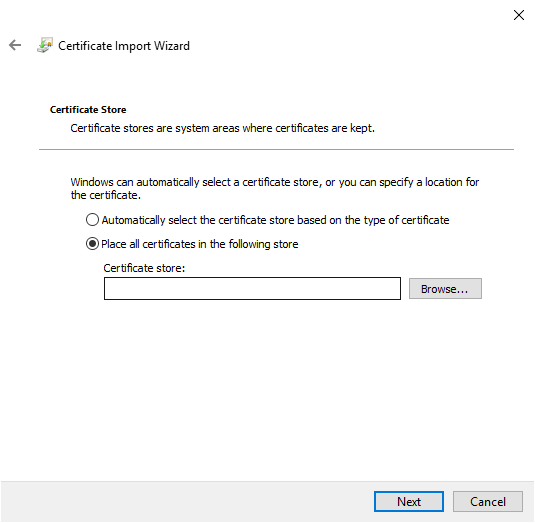
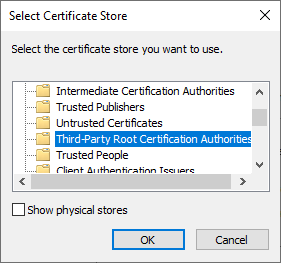
To make sure we get this root certificate from DigiCert into the right places, click the “Place all certificates in the following store” radio button, then click Browse. This will open the “Select Certificate Store” dialog.
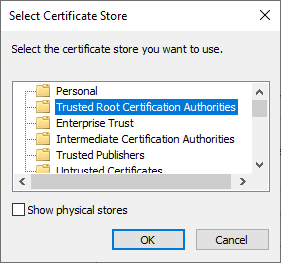
First, we’ll install the certificate to the “Trusted Root Certification Authorities.” Click “OK.” To finish, back on the Import Wizard click “Next,” then “Finish.”
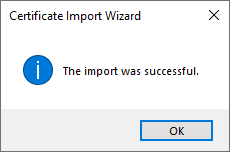
Isn’t that the best dialog for pretty much anything? We’re almost done! There’s one final step: repeating the process to install the certificate to the third-party certificate store.
Back on the Certificate (double-clicked) view of the DigiCertAssuredIDRootCA.crt file, repeat the process you previously used with the Certificate Import Wizard up to selecting the Certificate Store. You’ll again select “Local Machine,” Next, “Place all certificate in the following store,” and again “Browse.”
This time in Select Certificate Store, highlight “Third-Party Root Certification Authorities,” then “OK,” “Next,” and “Finish.”
That’s It; You’re Done!
At this point, re-run the offline installer, and it should work normally with the root certificate it needs already on the server. There’s a small possibility you may need to repeat this process for remote poller machines but be sure to run the “Plan” step in the installer first to see if the Orion installer can deploy it automatically for you. With air-gapped networks, you may need to manually deploy the DigiCert root manually but run the installer’s pre-flight test first to be sure. The Orion installer and Config Wizards are always the first tool to use when checking for configuration-related issues.
Hopefully, you won’t see any issues when upgrading due to missing or revoked certificates. Generally, everything you need is in whatever installer you’re using, and between the operating system, built-in certificate management processes, and the binary you’re installing, upgrades just work. Unplanned certificate revocation is rare but can occasionally leave a machine in a bit of limbo that’s usually easy to fix. The OS and signing certificates are your friends, negotiating and collaborating between you and what you’re trying to accomplish, vs. the system’s determination to block access to resources it can’t confirm. It’s a simple and effective system under the covers and generally keeps applications and teams humming with little fuss.