Many users out there are using Dynamic Query groups to automatically sort their nodes into groups as they are added to the platform for monitoring. This is great for managing large environments. However, one of the downsides to this is setting up automated maintenance windows for these groups. If you've used the Unmanage Utility you will quickly find that this tool does not display Groups. You can, however, leverage Custom Properties with this tool, but then that presents the next obstacle; you would need to automate Custom Property updates based on the Dynamic Query Group the node is in (you may be able to pull this off using alerts but that's not what this post is going to cover). And even if you correct that issue, the next problem will be that the Unmanage Utility generates a unique node URL for each node in the group. So, there is no way to unmanage the group as a whole but rather, each individual NodeID. The unmanage job must be updated when a new node is added (or removed). This is impossible to maintain in large environments.
Due to this behavior of the tool, I am aware of two options.
Option 1) Create a SQL script to unmanage the group. Then, create a SQL Agent Job (so the script can be automated to run at a desired time).
Option 2) Create a SWQL script to unmanage the group. Then, place it inside of a PowerShell script so it can be kicked off via .PS1 file. Create a Windows Scheduled Task to run the script at a desired time and frequency.
Option 1 is the simplest and can be implemented much cleaner IMO. So this will outline the steps for implementing option 1.
Saving and Modifying the Script
Save the following script as a SQL file. Preferably, open SQL Server Management Studio (SSMS), paste it in the query window and save the SQL file to the default location of SSMS. The default location will make it easier to set up the automation job. Each group will require its own script (unless you can read/write SQL).
The script really only needs one modification. It needs your Group name exactly as it appears. Edit line 8 to insert the group name.
SET ANSI_NULLS, QUOTED_IDENTIFIER ON;
DECLARE @UnManageFrom AS DateTime
DECLARE @UnManageUntil AS DateTime
DECLARE @GroupName AS VARCHAR(100)
DECLARE @GroupName2 AS VARCHAR(100)
--Enter your group name here.
SET @GroupName = 'Group A'
--SET @GroupName2 = 'Group B'
--Start and End time of maintenance window
SET @UnManageFrom = GETUTCDATE() --Database columns for Unmanage Timestamps are in UTC time
SET @UnManageUntil = DateAdd(hour,1,GETUTCDATE()) --Adds 1 hour to current time; total unmanage time will be precisely 1 hour
UPDATE n
SET n.Unmanaged=1 --Value of 1 unmanages the object
FROM [SolarwindsOrion].[dbo].[ContainerMemberSnapshots] AS cms WITH (NOLOCK)
INNER JOIN [SolarwindsOrion].[dbo].[Containers] AS c WITH (NOLOCK) ON cms.ContainerID = c.ContainerID
INNER JOIN [SolarwindsOrion].[dbo].[Nodes] AS n WITH (NOLOCK) ON n.NodeID=cms.EntityID
WHERE (c.Owner = 'Core') AND --(
c.Name = @GroupName --OR c.Name = @GroupName2 )
UPDATE n
SET n.UnManageUntil = @UnManageUntil
FROM [SolarwindsOrion].[dbo].[ContainerMemberSnapshots] AS cms WITH (NOLOCK)
INNER JOIN [SolarwindsOrion].[dbo].[Containers] AS c WITH (NOLOCK) ON cms.ContainerID = c.ContainerID
INNER JOIN [SolarwindsOrion].[dbo].[Nodes] AS n WITH (NOLOCK) ON n.NodeID=cms.EntityID
WHERE (c.Owner = 'Core') AND --(
c.Name = @GroupName --OR c.Name = @GroupName2 )
Script Notes
- The script above is for 1 group. However, I included commented out text to easily modify and point at a 2nd group and infinite more groups can be added to a single script. If you're going to modify for multiple groups, it might be cleaner to go by Group ID instead of by name. e.g. WHERE ContainerID IN (1,2,3)
- The script is set to remanage the object after 1 hour. You can easily modify this line [Line 13]: DateAdd(hour,1,GETUTCDATE()) --The ‘hour’ is the time unit (hours), and the number 1 after is how many hours to add. You could also change to 30 minutes by changing to: DateAdd(minute,30,GETUTCDATE())
- This script assumes you kept the default database name of SolarWindsOrion. If not, you'll need to update all appearances to your main database name.
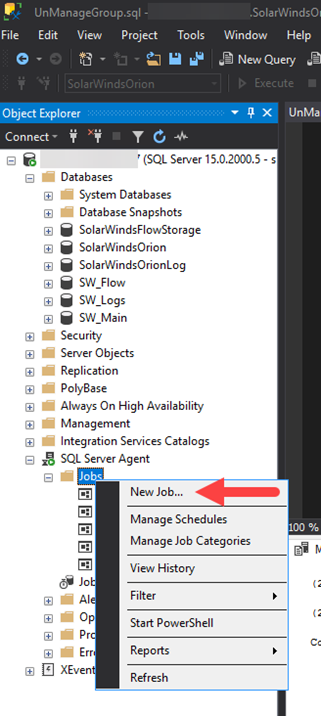
Creating the Automated SQL Job
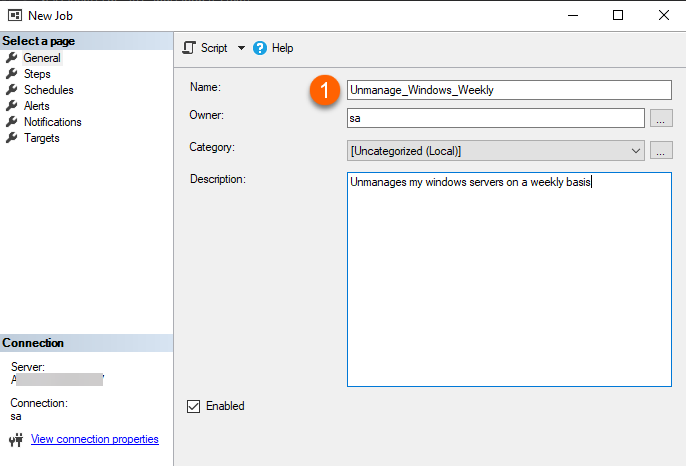
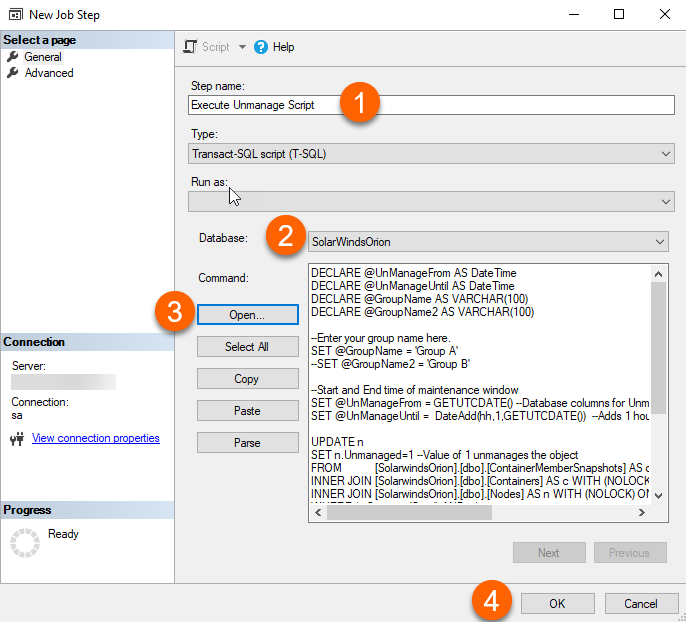
Within SSMS, under the SQL instance, expand SQL Server Agent, Right-click Jobs, and choose the New Job. Assign the job a name. Ideally, you will include the group name and frequency of the schedule (#1 below). You may optionally provide a description of the job.
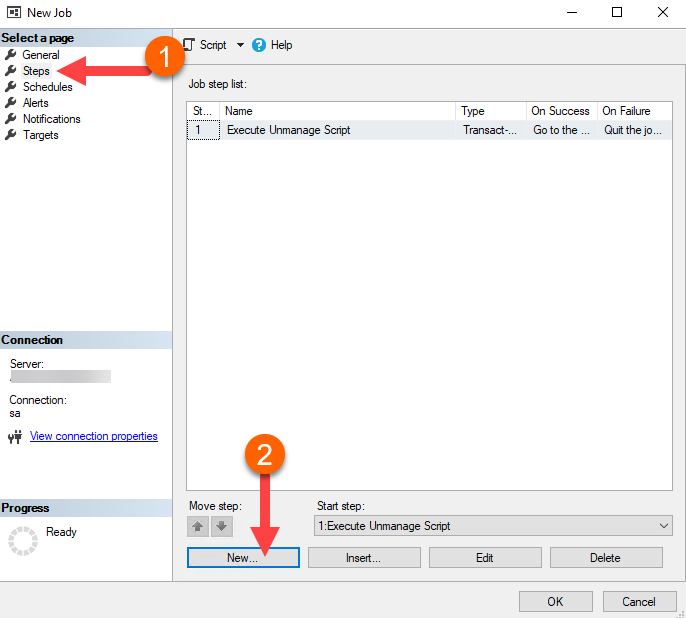
Go to Steps on the left pane pages. Click New… on the bottom.
Set the Name (#1)
Set the correct database (#2)
Select the script you saved (#3)
Hit ok to finish (#4).
Now, move to create the schedule frequency. Go to Schedules on the left.
Click New at the bottom. This will open the window to create a frequency. Make sure the schedule is set to never expire.
Save the schedule. Once done, click ok. The job is finished. It should now run automatically (ensure your SQL Agent is running).
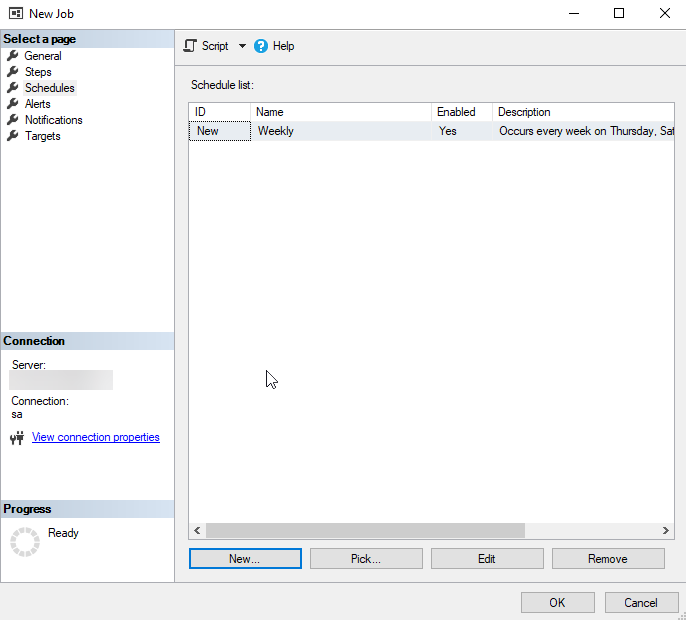
Build out additional Jobs for your other groups or if you have different frequencies of maintenance schedules. You can also have 1 single job perform multiple steps. And Schedule frequencies can be reused for multiple jobs as well. Just choose Pick… instead of New…
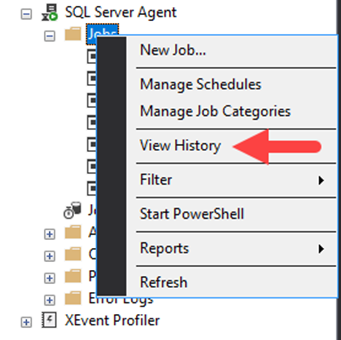
To determine if the jobs are running successfully, right-click the Jobs again and choose View History. Run results and errors will be present in the table. You will also want to ensure your SQL Agent is in a started state. You can tell in SSMS by the green indicator on the icon next to the line saying "SQL Server Agent."
You can also perform tests to ensure your work was done correctly. Verify by running a select UnManaged & UnManagedUntil off the nodes table (time is in UTC)
SELECT Caption, Unmanaged, UnmanageUntil FROM NodesData