I'd like to use NCM to backup our Infoblox Grid Masters and DHCP servers. If you have a procedure for accomplishing this, please share it with me.
Good networking!
Rick
Does anyone know how to send backup files from the Infoblox to the SolarWinds SCP server?
I've not yet found a way to use NCM to manage Infoblox configuration files for backup / restore / comparison, but Infoblox does support backups & restores via their own internal processes. If you have the manual for Infoblox, just search for "Backing Up Files".
I'm running version 6.7.0 Infoblox, and automatically back the data up nightly onto an external server that runs FileZilla, but there's no reason you couldn't use SolarWinds SCP / TFTP server instead of FileZilla.
The short version:
Install a TFTP or FTP or SCP server on your network.
Start up Infoblox.
From the Grid tab, select the Grid Manager tab, and then click Backup -> Schedule Backup from the Toolbar.
Run through the options & test the backup, modify as needed.
The long version:
From the Admin Guide for Infoblox 6.7.0:
Backing Up Files
You can back up system files periodically and on demand. You can then restore the files on the same appliance or on
a different appliance. For information about restoring files, see Restoring Backup Files on page 379. You can
configure the appliance to automatically back up the files on a weekly, daily, or hourly basis.
Infoblox recommends that you back up the system files during off-hours to minimize the impact on network services.
By default, the automatic backup function is turned off. You must log in with a superuser account to back up files.
You can back up system files to the following:
• A local directory
• The management system that you use to operate the appliance
• A TFTP server
• An FTP server. This option requires that you have a valid username and password on the server prior to backing
up files.
• An SSH server that supports SCP. This option requires that you have a valid username and password on the
server prior to backing up files
Local Backup
You can store a backup file on the appliance itself. However, Infoblox recommends that you store backup files in an
alternate location. When you back up the system files locally, the appliance uses the following format to name the
file: Infoblox_year_month_day_time. For example, a file name of Infoblox_2008_11_30_23_00 means that the file is
backed up on November 30th, 2008 at 11:00 PM.
The appliance can save up to 20 configuration files, regardless of how often the files are saved (weekly, hourly, or
daily). Ensure that you take the size of the configuration file into consideration when backing up files because the
storage limit on an appliance is 5 Gb (gigabytes). If your configuration file is 500 Mb (megabytes), then the appliance
can store 10 configuration files. When uploading configuration files on to a TFTP, FTP, or SCP server, you must consider
the file size on that server as well.
Using TFTP
TFTP is a client-server protocol that uses UDP as its transport protocol. It does not provide authentication or
encryption, therefore it does not require a username or password.
When you back up the system files to a TFTP server, you select the backup file you want to download, enter the name
in which the file is stored on the TFTP server and the server IP address.
Using FTP
FTP is a client-server protocol used to exchange files over TCP-based networks. The appliance, as the FTP client,
connects to a remote FTP server that you identify. When you use FTP to back up the system files, the password and
file contents are transmitted in clear text and may be intercepted by other users.
When you back up the system files to an FTP server, the appliance, as the FTP client, logs on to the FTP server. You
must specify the username and password the appliance uses to log on to the FTP server. The user account must have
write permission to the directory to which the appliance uploads the backup file.
Using SCP
SCP is more secure than TFTP and FTP. It uses the SSH protocol to provide authentication and security. You can use
SCP to back up the NIOS system files to a server running SSHv2.
When you use SCP to back up the system files to an SSH server, you must specify the username and password the
appliance uses to log on to the server. The user account must have write permission to the directory to which the
appliance uploads the backup file. In addition, make sure that you enter the correct IP address of the SSH server; the
appliance does not check the credentials of the SSH server to which it connects.
Automatically Backing Up Data Files
Infoblox recommends that you back up your configuration files regularly, and the easiest way to accomplish this task
is to configure the appliance to back up the configuration file automatically. You can choose when and how often files
are backed up: weekly, daily, or hourly. When you automatically back up a configuration file on the appliance, the file
is named in the format Infoblox_year_month_day_time. The default time for an automatic backup is 3:00 AM.
Configuration files should be backed up during the slowest period of network activity.
To automatically back up a database file on an independent appliance or Grid Master:
1. From the Grid tab, select the Grid Manager tab, and then click Backup -> Schedule Backup from the Toolbar.
2. In the Schedule Backup dialog box, select the destination of the backup file from the Backup to drop-down list:
— TFTP: Back up system files to a TFTP server.
— IP Address of TFTP Server: Enter the IP address of the TFTP server to which you want to back up the
system files.
— Directory Path: Enter the directory path of the file. For example, you can enter /archive/backups on a
Linux system, or c:\archive\backups on a Microsoft Windows system. The directory path cannot
contain spaces. The folder or directory you enter here must already exist on the specified server. Do not
include the file name in the directory path.
— Recurrence: Select how often you want to back up the files. You can select Weekly, Daily, or Hourly from
the drop-down list. When you select Weekly, complete the following:
• Every: Choose a day of the week from the drop-down list.
• Time: Enter a time in the hh:mm:ss AM/PM format. You can also click the clock icon and select a
time from the drop-down list. The Grid Master creates a backup file on the selected day and time
every week.
When you select Daily, enter a time in the hh:mm:ss AM/PM format. You can also select a time from the
drop-down list.
When you select Hourly, complete the following:
• Minutes after the Hour: Enter the minute after the hour when the Grid Master creates a backup file.
For example, enter 5 if you want the Grid Master to create a backup file five minutes after the hour
every hour.
— Disable Scheduled Backup: Select this if you want to disable automatic backups from occurring now.
You can still save the settings for future use.
— FTP: Back up system files to an FTP server.
— IP Address of FTP Server: The IP address of the FTP server.
— Username: Enter the username of your FTP account.
— Password: Enter the password of your FTP account.
— Recurrence: Select how often the scheduled backups should occur. You can select Weekly, Daily, or
Hourly. For information, see TFTP.
— Disable Scheduled Backup: Select this if you want to disable automatic backups from occurring now,
but want to save the settings for future use.
— SCP: Back up system files to an SSH server that supports SCP.
— IP Address of SCP Server: The IP address of the SCP server.
— Username: Enter the username of your SCP account.
— Password: Enter the password of your SCP account.
Hourly. For information, see the TFTP section.
Note: When you select FTP or SCP, ensure that you have a valid username and password on the server prior to
backing up the files.
— Grid Master (Local): Back up to a local directory on the Grid Master. This is the default.
By default, the Grid Master generates a backup file and saves it locally in its own storage at 3:00 AM daily.
Be aware that backing up the Grid and saving it locally on an hourly basis increases the turnover of files
stored on the Grid Master. Backing it up hourly to a remote server increases the overall amount of traffic on
your network.
3. Save the configuration and click Restart if it appears at the top of the screen.
Manually Backing Up Data Files
You can manually back up a data file in addition to scheduling your backups.
To back up manually:
1. From the Grid tab, select the Grid Manager tab, and then click Backup -> Manual Backup from the Toolbar.
2. In the Backup wizard, select the destination of the backup file from the Backup to drop-down list:
— My Computer: Back up system files to a local directory on your computer. This is the default.
— Filename: Enter the directory path and the file name of the backup file. For example, you can enter
/archive/backups/Infoblox_2009_10_20_15_30 on a Linux server, or
c:\archive\backups\Infoblox_2009_10_20_15_30 on a Microsoft Windows server.
3. Click Backup.
Downloading Backup Files
You can save an existing backup file, or create and save a new one to your local management system, a TFTP server,
an FTP server, or a SCP server.
To download an existing backup file:
1. From the Grid tab, select the Grid Manager tab, and the click Backup -> Manage Local Backup from the Toolbar.
Grid Manager displays the current backup files in the Manage Local Backups dialog box.
2. To download a backup file, select the check box of a backup file, and then click the Transfer icon. You cannot
select multiple files for downloading.
3. Select one of the following from the Backup to drop-down list:
— My Computer: Backup to a local directory on your computer. This is the default.
— TFTP: Save the backup file to a TFTP server.
— IP Address of TFTP Server: Enter the IP address of the TFTP server to which you want to save the backup
file.
— FTP: Save the backup file to an FTP server.
— Username: Enter the username of your FTP server account.
— Password: Enter the password of your FTP server account.
— SCP: Save the backup file to an SSH server that supports SCP.
— Username: Enter the username of your SCP server account.
— Password: Enter the password of your SCP server account.
4. Click Transfer Copy.
Restoring Backup Files
You can restore a backup up file to an appliance running the same NIOS version as that of the appliance from which
the backup file originates. You can also restore a backup file from an appliance running a NIOS version to an
appliance running a later NIOS version as long as the upgrade from the earlier NIOS version to the later version is
supported. For example, you can restore a backup file from an appliance running NIOS 4.3r6-1 to an appliance
running NIOS 5.0r1-0 because upgrading from NIOS 4.3r6-1 to 5.0r1-0 is supported. However, you cannot restore a
backup file from an appliance running NIOS 4.1r2-1 to an appliance running NIOS 5.0r1-0 because upgrading from
NIOS 4.1r2-1 to 5.0r1-0 is not supported.
You can restore an existing backup file on the appliance from which it originates, or restore a backup file from a
different appliance (referred to as a forced restore). To download a backup file from a different appliance, see
Downloading Backup Files from a Different Appliance on page 380.
You must log in with a superuser account to back up and restore files.
There are three ways to restore a backup file:
• From a local directory or the management system you use to operate the appliance
• From a TFTP server
• From a remote server using FTP. This option requires that you have a valid username and password on the FTP
server prior to performing a backup or restore.
To restore a backup file to the same independent appliance or Grid Master:
1. From the Grid tab, select the Grid Manager tab, and then click Restore from the Toolbar.
2. In the Restore dialog box, choose one of the following from the Restore from drop-down list:
— My Computer: Restore a file from your local computer. This is the default.
— Filename: Click Select File to navigate to the configuration file.
— TFTP: Restore a file from a TFTP server.
— Filename: Enter the directory path and the file name you want to restore. For example, you can enter
— IP Address of TFTP Server: Enter the IP address of the TFTP server from which you restore the
configuration file.
— FTP: Restore a file from an FTP server.
• Grid Master (Local): Restore from a local directory on the Grid Master. In the Backup Set table, select the file you
want to restore.
3. Click Restore. In the Confirm Restore dialog box, click Yes.
After restoring the file, the appliance restarts. The restore process overwrites all existing data. All pending
scheduled tasks are not restored or reverted.
4. Close your current browser window, wait a few minutes, and then reconnect to the NIOS appliance.
Downloading Backup Files from a Different Appliance
When you “force restore” a NIOS appliance, you download a backup file from one appliance to a different appliance.
To restore a backup file to the same appliance or Grid Master, use the Restore function as described in Restoring
Backup Files on page 379.
To download a backup file from one appliance to a different appliance:
2. In the Restore wizard, do the following:
— Restore from: Choose a source from which you restore the configuration file, as described in Restoring
3. Select Force Restore from Different Grid to enable the feature, and then select one of the following:
— Retain Current Grid Master IP Settings (this is the default)
— Overwrite Grid Master IP Settings
4. Click Restore. In the Confirm Restore dialog box, click Yes.
After restoring the file, the appliance reboots. The restore process overwrites all existing data. All pending
5. Close your current browser window, wait a few minutes, and then reconnect to the NIOS appliance.
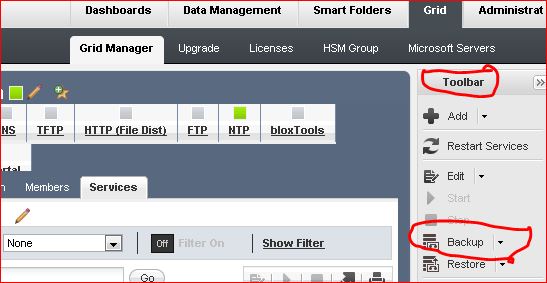
A picture is more intuitive, so here's a small screen shot.
1. Click on Grid.
2. Select Grid Manager
3. Ensure you have the Toolbar on the right expanded so you can see the options.
4. Select Backup and choose your options / preferences.
I've been told that it is not possible for NCM to backup Infoblox. Infoblox does not have the option to initiate a backup via CLI and I was told this is crucial to developing a device template to backup Infoblox.