We all love the visual representation of our network devices provided by SolarWinds, especially the detailed interface layouts in the Device View. However, you might have noticed that the graphical stencil templates (the physical layout of interfaces) are often pre-configured for only a very limited set of specific hardware models. This can be a limitation when you introduce new hardware that is similar to existing, supported models. Ideally, stencils should be assignable from the Device Poller (AKA Device Studio).
This article is aimed at helping you extend the power of Device View. We'll focus on reusing an existing stencil layout and applying it to other, similar device models without needing to create a stencil from scratch. I am hoping in a near future post to cover how to modify existing stencils.
IMPORTANT DISCLAIMER: Database Modification
The instructions below involve direct modifications to your SolarWinds Platform database. While these steps are designed to be safe if followed precisely, any direct database manipulation carries inherent risks.
It is absolutely critical that you perform a full backup of your SolarWinds Platform database before proceeding with any of these steps. Review those steps before proceeding at your own risk.
Understanding Stencil Assignments
Before we dive into the SQL queries, let's quickly define the key components involved in assigning stencils:
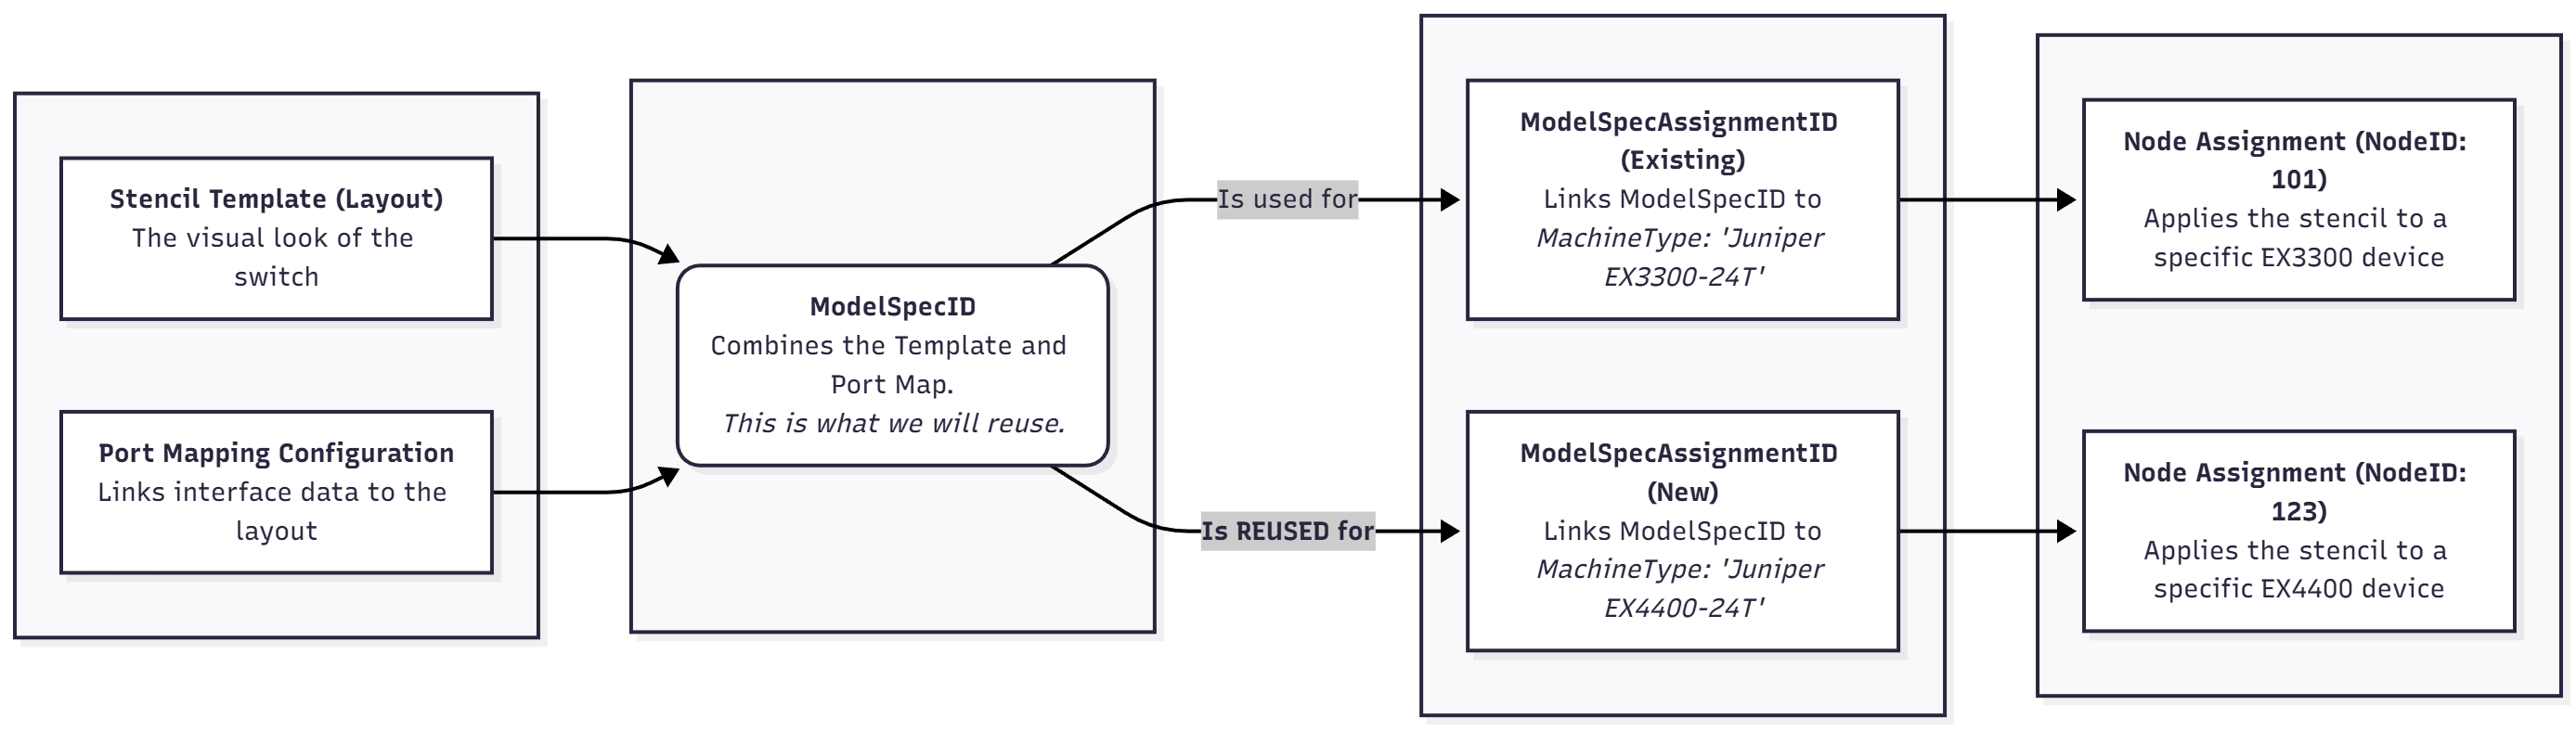
- Stencil Template (Layout) (
TemplateID): This is the visual representation of a device's physical ports and interfaces. - Port Mapping Configuration (
PortMappingConfigurationID): This defines how actual interface data from the device maps to the visual elements in the stencil. - Model Specification ID (
ModelSpecID): A unique identifier that links a specific stencil template (TemplateID) and its port mapping configuration (PortMappingConfigurationID). - Model Specification Assignment (
ModelSpecAssignmentID): This is the bridge that connects a ModelSpecID to a specific MachineType (e.g., 'Juniper EX4400-24T'). A single ModelSpecID can be assigned to multiple MachineTypes. - Node Specification Assignment (
Stencil_NodeSpecAssignments): This table links a specific node (your monitored device) to a ModelSpecAssignmentID, thereby applying the stencil to that device.
Essentially, we want to create a new entry in Stencil_ModelSpecAssignments that points a new MachineType to an existing ModelSpecID (which holds the layout we want to reuse). Then, we'll link our specific nodes to this new assignment.
Scenario: Applying an Existing Stencil to a New Model
Let's say you have a Juniper EX3300-24T device with a perfectly configured Device View stencil. Now, you've added Juniper EX4400-24T switches, and you want them to use the same visual layout as the EX3300.
Step 1: Create a New Model to Template Assignment
This step involves creating a new record in the Stencil_ModelSpecAssignments table. We'll point it to an existing ModelSpecID that has the desired layout, and assign it to our new MachineType.
- Find an Existing ModelSpecID First, you need to find the
ModelSpecID of a machine type that already has the stencil layout you want to replicate. Run this query, looking for the Vendor and MachineTypethat matches your desired layout (e.g., 'Juniper EX3300-24T').
-- Find existing stencil assignments, filter by vendor
SELECT TOP 1000 *
FROM [dbo].[Stencil_ModelSpecAssignments]
WHERE Vendor LIKE 'Juniper%' -- Adjust 'Juniper%' if you are working with another vendor
From the results, identify the ModelSpecID that corresponds to the device model whose stencil layout you wish to copy. Copy this ModelSpecID value.
- Create the New Assignment Now, we'll insert a new record. We'll use the ModelSpecID we just copied and associate it with our new MachineType. Replace the placeholder values with your specific details.
-- Define variables for the new assignment
DECLARE @ModelSpecID AS uniqueidentifier  = 'PASTE_YOUR_COPIED_MODELSPEC_ID_HERE'; -- <<< REPLACE THIS with the ModelSpecID from the previous query
DECLARE @MachineType NVARCHAR (510) = 'Juniper EX4400-24T'; -- <<< REPLACE THIS with the EXACT MachineType of your new device model
DECLARE @Vendor NVARCHAR (255) = 'Juniper Networks, Inc.'; -- <<< REPLACE THIS with the Vendor name as it appears in the table
-- Insert the new assignment
INSERT INTO [dbo].[Stencil_ModelSpecAssignments] (ModelSpecAssignmentID, Vendor, MachineType, ModelSpecID)
VALUES (newid(), @Vendor , @MachineType , @ModelSpecID );
-- Optional: Verify the insertion (replace @MachineType if needed )
SELECT *
FROM [dbo].[Stencil_ModelSpecAssignments]
WHERE MachineType = @MachineType ;.
After running this, you should see a new entry for your MachineType pointing to the chosen ModelSpecID. The newid() function automatically generates a unique ModelSpecAssignmentID for this new assignment.
Step 2: Assign the New Stencil to Your Devices
With the assignment created, you can now link your actual network devices (nodes) to this new stencil configuration.
- Option 1: Assign to a Single Node If you want to apply the stencil to just one specific device, use this query. You'll need the NodeID of the device.
-- Define variables for single node assignment
DECLARE @MachineType NVARCHAR (510) = 'Juniper EX4400-24T'; -- <<< REPLACE THIS with the MachineType you just assigned
DECLARE @NodeID INT  = 123; -- <<< REPLACE THIS with the NodeID of the specific device you want to update
DECLARE @ModelSpecAssignmentID AS uniqueidentifier ;
-- Get the ModelSpecAssignmentID for the MachineType we just created
SELECT
    @ModelSpecAssignmentID  = [ModelSpecAssignmentID]
FROM [dbo].[Stencil_ModelSpecAssignments]
WHERE MachineType = @MachineType ;
-- Insert the assignment for the specific node
INSERT INTO [dbo].[Stencil_NodeSpecAssignments] (NodeID, SwitchNumber, ModelSpecAssignmentID)
VALUES (@NodeID , 1, @ModelSpecAssignmentID ); -- SwitchNumber is typically 1 for most devices
- Option 2: Assign to ALL nodes of a given MachineType: To apply to all nodes in your inventory that matches the
MachineType
-- Define variable for bulk assignment
DECLARE @MachineType NVARCHAR (510) = 'Juniper EX4400-24T'; -- <<< REPLACE THIS with the MachineType you just assigned
DECLARE @ModelSpecAssignmentID AS uniqueidentifier ;
-- Get the ModelSpecAssignmentID for the MachineType
SELECT
    @ModelSpecAssignmentID  = [ModelSpecAssignmentID]
FROM [dbo].[Stencil_ModelSpecAssignments]
WHERE MachineType = @MachineType ;
-- Insert assignments for all nodes matching the MachineType that don't have one already
INSERT INTO [dbo].[Stencil_NodeSpecAssignments] (NodeID, SwitchNumber, ModelSpecAssignmentID)
SELECT TOP 1000
    n.NodeID,
    1 AS SwitchNumber,
    @ModelSpecAssignmentID AS ModelSpecAssignmentID
FROM [dbo].[Nodes] AS n
WHERE n.MachineType = @MachineType
AND  n.NodeID NOT IN (SELECT sna.NodeID FROM [dbo].[Stencil_NodeSpecAssignments] AS sna); -- Efficiently checks if assignment already exists to prevent errors
Note: The TOP 1000 is a safety measure. Adjust if you have more than 1000 nodes of this type to update.
Admire Your Work!

Once you've completed the relevant assignment steps, navigate to a node's detail page for the MachineType you just configured. Click on the Device View icon in the left-hand navigation pane. You should now see the stencil layout you duplicated applied to your device!

This method is a fantastic way to quickly bring visual consistency to your network devices without the overhead of creating new stencil templates from scratch.
Happy monitoring! 😁