Hello there! My name is Cody Lee; I am one of the Software Development Engineers in Test (SDET for short) at SQL Sentry.
The SQL Sentry Engineering team recently added the SQL Sentry Portal to the SQL Sentry Unified Installer. I won't provide a full explanation of the SQL Sentry Portal functionality in this blog post; if you’re new to the SQL Sentry Portal, follow along for the basics and ask questions in the forum for clarification.
In this blog post, you will learn how to download the SQL Sentry Unified Installer, where to install it, the overall SQL Sentry Portal installation and authentication steps, and general SQL Sentry Portal configuration. I'll also point out documentation that will help you dive more deeply into the SQL Sentry ecosystem and all the rich features available to you.
Where to Get SQL Sentry Portal
Download the SQL Sentry Unified Setup executable file from your Customer Portal. If you don't already have an account, you can create one by purchasing SQL Sentry or signing up for a free SQL Sentry trial.
After you log in to your account, you can navigate to the Downloads tab and select Download Product. From there, select SolarWinds SQL Sentry and your license
Determining Where to Install the SQL Sentry Portal
There are a few things to consider when choosing an installation location for the SQL Sentry Portal:
- Does the install location have access to your SQL Sentry database?
- Does the user who is installing the SQL Sentry Portal have administrative rights to the installation location?
Installation Steps
Once you determine where you are going to install the SQL Sentry Portal, installation is very straightforward. I won’t explain every step of the installation process here because our documentation team does a fantastic job of explaining it in our installation guide. What I will do is call out a few important installation pages specifically for the SQL Sentry Portal.
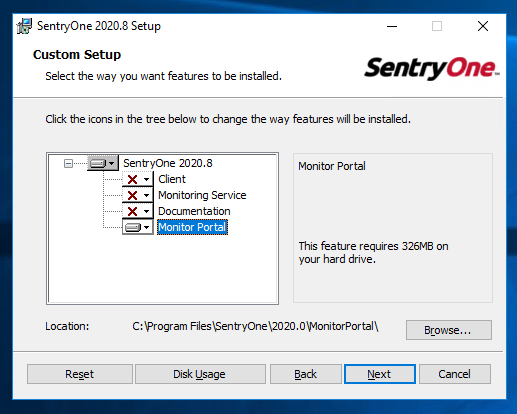
Feature Installation Selection
Now that the SQL Sentry Portal has been added to the SQL Sentry installer, you will see a new option on the Custom Setup screen during installation.
For the purpose of this walk-through, we will discuss installing only the SQL Sentry Portal, so you want to select Monitor Portal and deselect everything else prior to continuing installation.
Portal Service Authentication
SQL Sentry Portal uses SQL Server authentication to allow the service to connect to the SQL Sentry database. In this step, you need to make sure to enter user credentials that have access to the SQL Sentry database. Once these credentials are entered, you can validate proper connection to the SQL Server instance by clicking the Test button.
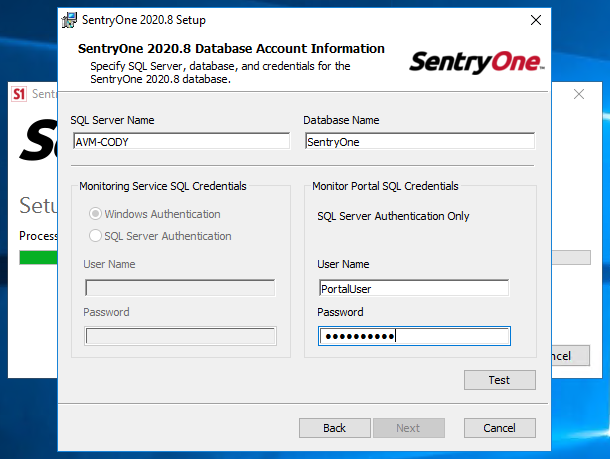
After a few seconds you should receive a confirmation that the credentials were properly validated. Otherwise, you'll receive an error message providing some information on what went wrong. If you have trouble connecting, the SQL Sentry Support team is ready to help.
Service Configuration
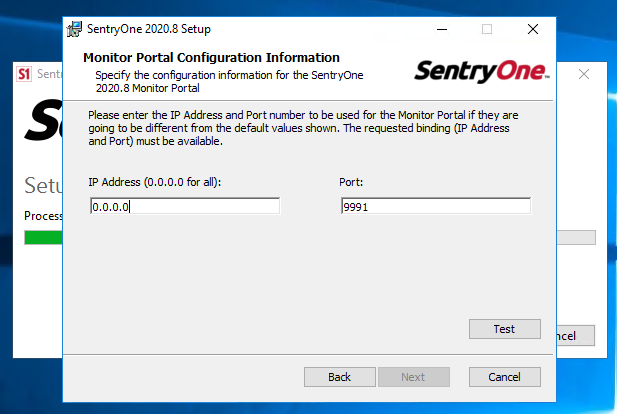
The last step of the initial SQL Sentry Portal installation is an optional configuration of the IP address and port that the SQL Sentry Portal service will be running under. If no changes need to be made to the IP address or port, feel free to leave the default values.
Once you are done configuring these values, click the Test button, which lets the installer validate the settings to make sure no other services are already using the port specified.
Windows Firewall Rules
Regardless of the settings used in the previous step (default or custom port, for example) this next step is important to ensure the SQL Sentry Portal service can be reached outside of the machine it is being installed on.
Inbound and Outbound rules need to be added to Windows Firewall security settings for the specific ports used during the setup. It's important to note, however, that you should be sure to consult with your system administrator prior to adding or modifying any security settings. Your environment might be different than this example scenario, so it is always best to double-check security settings!
Finishing Up the SQL Sentry Portal Installation Process
Now that all the basic configuration has been performed, the rest of the installation process can be completed. These steps are explained in great detail in the installation documentation, so be sure to reference that page.
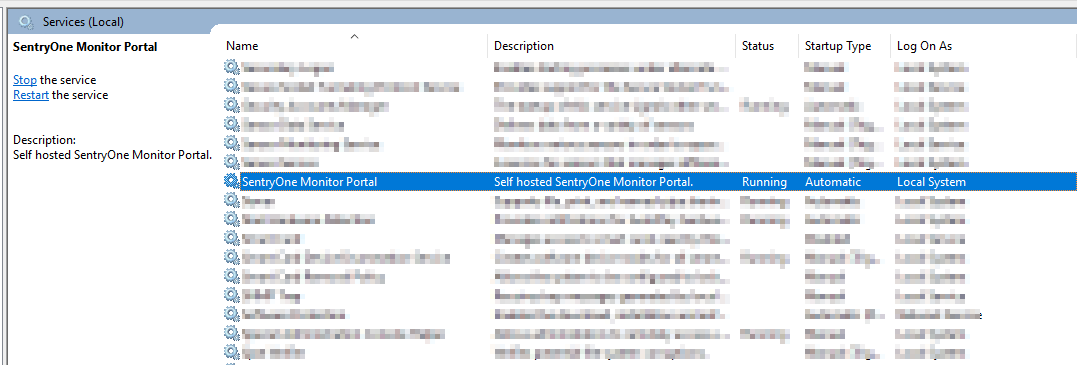
Once the SQL Sentry Portal installation has been completed, you should find a new service running on the machine called "SQL Sentry Monitor Portal." If the Services program was already running, you might need to click the refresh button to see the new service.
 After you have confirmed the new service is running, you can open a browser and navigate to the SQL Sentry Portal URL.
This URL depends on the settings that were used before, but in this case, you can navigate to the SQL Sentry Portal using one of the following URLs:
After navigating to the SQL Sentry Portal URL, you should see a page very similar to the one shown in following screenshot: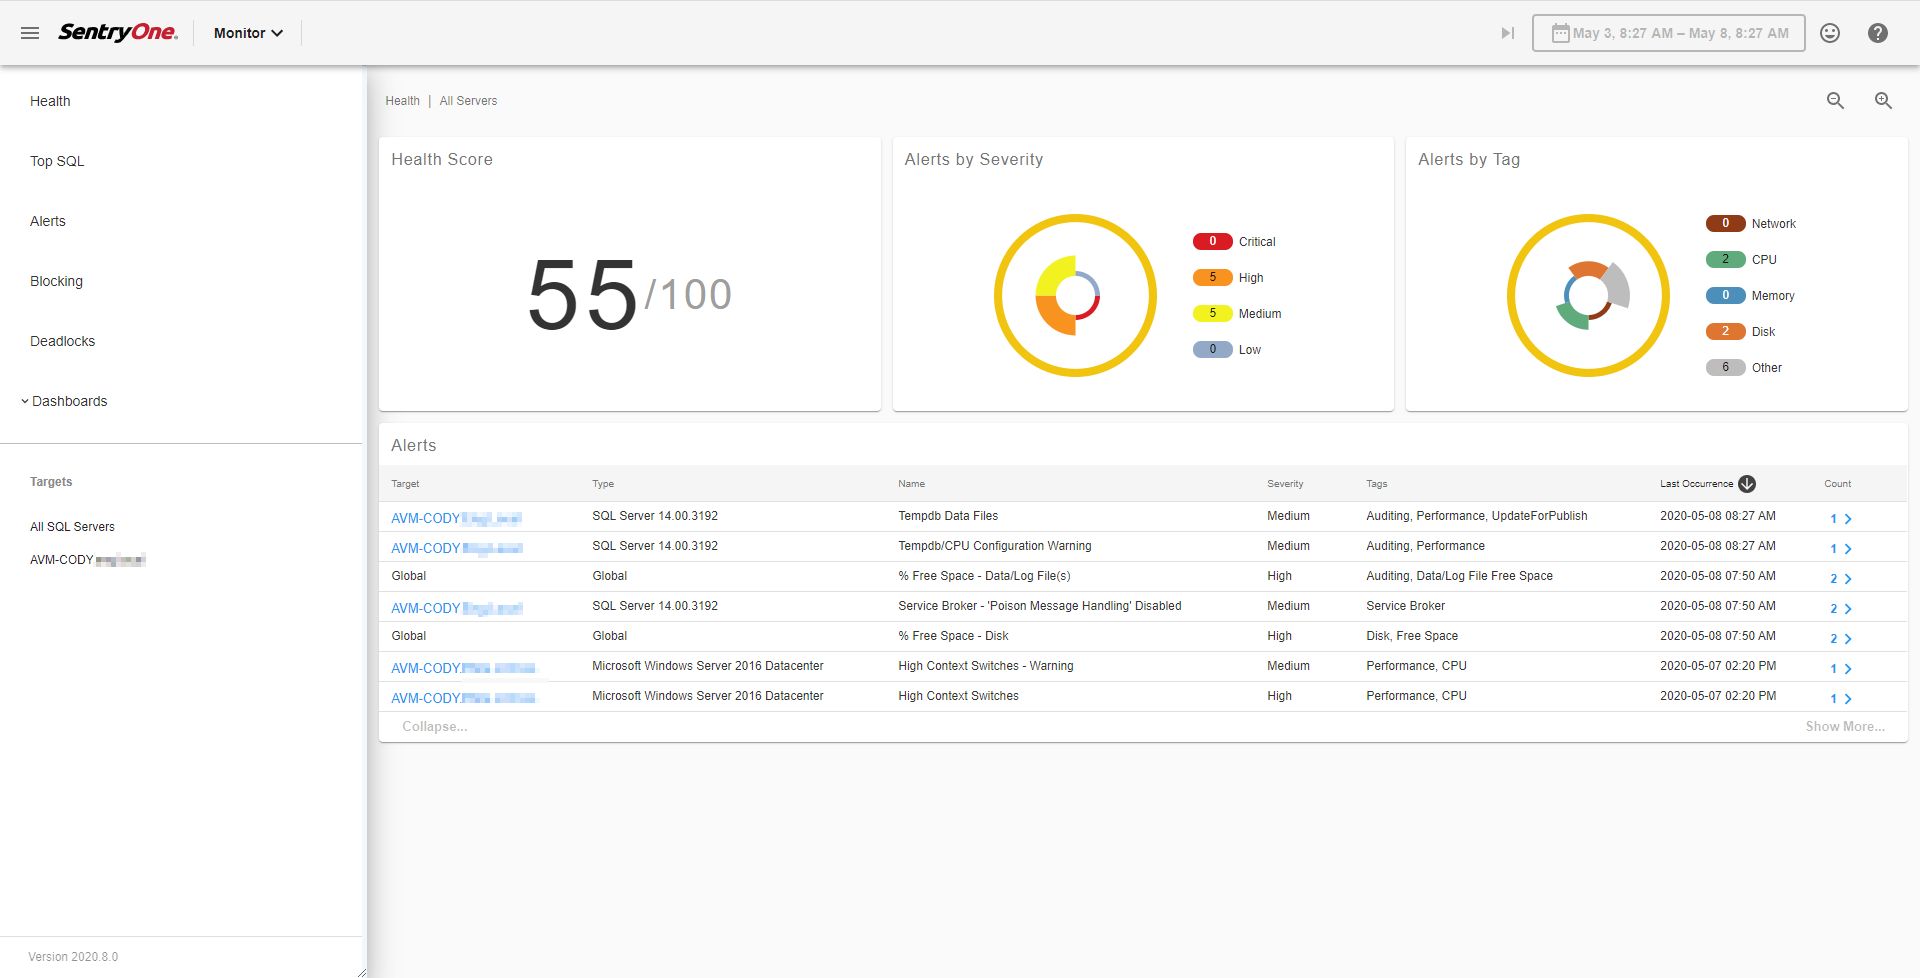
Congratulations! You have successfully installed the SQL Sentry Portal and you can begin to explore all the features it has to offer.
If you experience any issues accessing the SQL Sentry Portal at this point, I recommend reviewing the installation documentation for the SQL Sentry Portal, with an emphasis on security settings, as these can be the sticking point for installations. Again, support services are also ready to help.
Basic Configuration Steps
Now that you have the SQL Sentry Portal installed and running, you can explore its features to get a better understanding of the health of the environment you're monitoring with SQL Sentry. If, at any time, you need to modify a SQL Sentry Portal setting, we provide an application to help you through those changes.
The SQL Sentry Portal Configuration Utility is a simple application that will allow you to quickly make changes to the SQL Sentry Portal configuration.

The basic configuration options include:
- Database Configuration—This option allows you to change the connection settings for the SQL Sentry database in the event that security changes occur or the database is moved to another server.
- Binding—These were originally found during installation, but in the event that changes need to be made to either the port or IP numbers, they can be made here.
Once changes are made to the configuration, click "Verify & Save." A message will be added to the Messages area letting you know the save was complete and that you can close the Configuration Utility.
Next Steps (Advanced Configuration)
After exploring the SQL Sentry Portal, you might want to know more about the SQL Sentry Portal Configuration Utility. There is a thorough explanation of this utility, as well as the advanced properties section, in the SQL Sentry Portal documentation.
Stay Up-to-Date on the Latest Features
Congratulations, you have successfully installed and configured the SQL Sentry Portal. The SQL Sentry Portal has been a passion project for the SQL Sentry Engineering team, and we hope you enjoy using it as much as we've enjoyed developing it.
New features are always in the works, so be sure to check out the SQL Sentry Change List periodically to keep up to speed on the latest and greatest SQL Sentry features!