I find myself continually needing a database to execute tests, generate a workload, and more. I typically create an AdventureWorks database since there are plenty of resources for it. This need pushed me to create a container with AdventureWorks preconfigured to just spin up a new version when needed and then discard it when I was finished. I was initially going to build it from the installations scripts, but there are a few commands in the script that aren't supported on the Linux platform. That left me with restoring from the backups provided. We will be using SQL Server 2019 and the AdventureWorks2019.bak. Let's get started building a AdventureWorks 2019 container.
Required Software
To follow along with this blog post, you just need Docker installed. Learn how to install Docker from the official docs located here. This blog post was written using Docker Desktop for Windows.
Getting Started
The first step is to create a Dockerfile and define the base image you want to use. In this example, I'm going to use the mcr.microsoft.com/mssql/server:2019-CU5-ubuntu-18.04 image.
# Dockerfile
#
# Adventure Works Database on SQL Server 2019
FROM mcr.microsoft.com/mssql/server:2019-CU5-ubuntu-18.04
We are going to set environment variables for accepting the EULA and setting an SA password. This isn't a production approach and shouldn't be used outside of creating images for testing purposes.
# Note: This isn't a secure password, and please don't use this for production.
ENV SA_PASSWORD=ThisIsAReallyCoolPassword123
ENV ACCEPT_EULA=Y
Now, set the user to the mssql user so that the restore is executed with the user that will be running the SQL Server process. This ensures that file permissions are correctly configured.
# Setting the user
USER mssql
Then, download the AdventureWorks2012.bak file and place it in the same directory as Dockerfile. You will copy that file into the folder structure for SQL Server. This creates a new directory called backup.
COPY AdventureWorks2019.bak /var/opt/mssql/backup/
With the backup inside the container, you can restore the database. First, you need to make sure that SQL Server has started. Once it has started, you can execute the SQL command to restore your database and log file. In the case of the AdventureWorks 2019 backup, the logical names did not match what was expected, so I had to use the FILELISTONLY command on the backup first to determine the logical names. Keep that in mind if you run into any issues restoring your backup.
# Launch SQL Server, confirm startup is complete, restore the database, then terminate SQL Server.
RUN ( /opt/mssql/bin/sqlservr & ) | grep -q "Service Broker manager has started" \
    && /opt/mssql-tools/bin/sqlcmd -S localhost -U SA -P ${SA_PASSWORD} -Q 'RESTORE DATABASE AdventureWorks2019 FROM DISK = "/var/opt/mssql/backup/AdventureWorks2019.bak" WITH MOVE "AdventureWorks2017" to "/var/opt/mssql/data/AdventureWorks2019.mdf", MOVE "AdventureWorks2017_Log" to "/var/opt/mssql/data/AdventureWorks2019_log.ldf", NOUNLOAD, STATS = 5' \
    && pkill sqlservr
Once you have the backup restored successfully, you will need to add the SQL Server's execution back for good measure.
CMD ["/opt/mssql/bin/sqlservr"]
Here is the completed file.
# Dockerfile
#
# Adventure Works Database on SQL Server 2019
FROM mcr.microsoft.com/mssql/server:2019-CU5-ubuntu-18.04

# Note: This isn't a secure password, and please don't use this for production.
ENV SA_PASSWORD=ThisIsAReallyCoolPassword123
ENV ACCEPT_EULA=Y

# Setting the user
USER mssql

COPY AdventureWorks2019.bak /var/opt/mssql/backup/

# Launch SQL Server, confirm startup is complete, restore the database, then terminate SQL Server.
RUN ( /opt/mssql/bin/sqlservr & ) | grep -q "Service Broker manager has started" \
    && /opt/mssql-tools/bin/sqlcmd -S localhost -U SA -P $SA_PASSWORD -Q 'RESTORE DATABASE AdventureWorks2019 FROM DISK = "/var/opt/mssql/backup/AdventureWorks2019.bak" WITH MOVE "AdventureWorks2017" to "/var/opt/mssql/data/AdventureWorks2019.mdf", MOVE "AdventureWorks2017_Log" to "/var/opt/mssql/data/AdventureWorks2019_log.ldf", NOUNLOAD, STATS = 5' \
    && pkill sqlservr

CMD ["/opt/mssql/bin/sqlservr"]
Now you have a complete Dockerfile that you can use to build a container that will have the AdventureWorks 2019 database ready to use. Build your container using the following command.
$ docker build -t adventureworks:2019
Sending build context to Docker daemon  334.3MB
Step 1/9 : FROM mcr.microsoft.com/mssql/server:2019-CU5-ubuntu-18.04
---Removed---
Processed 26344 pages for database 'AdventureWorks2019', file 'AdventureWorks2017' on file 1.
Processed 2 pages for database 'AdventureWorks2019', file 'AdventureWorks2017_log' on file 1.
RESTORE DATABASE successfully processed 26346 pages in 0.891 seconds (231.003 MB/sec).
Removing intermediate container 3cf414b336c4
 ---> 7420ec09d77c
Step 9/9 : CMD ["/opt/mssql/bin/sqlservr"]
 ---> Running in 918f1da05269
Removing intermediate container 918f1da05269
 ---> a4656a4e09dc
Successfully built a4656a4e09dc
Successfully tagged adventureworks:2019
You finally have a container that you can run.
Running the AdventureWorks 2019 Database
Your container has been built successfully, and now it is ready to be used. You can run your container by running the following command to map the port you want to use, the container name, and the hostname. The port you are using is 1633, so it doesn't conflict with any running SQL Server instances on the machine running Docker.
$ docker run -p 1633:1433 --name adventureworks2019 -h adventureworks2019 -d adventureworks:2019
e07d0406ca31eda958c9ed2a830bf83fea3c9d15ba2c43870410766a40a112d6
You can verify that it is running with the following command.
$ docker container list
CONTAINER ID  IMAGE                 COMMAND                  CREATED         STATUS         PORTS                    NAMES
e07d0406ca31  adventureworks:2019   "/opt/mssql/bin/perm…"   46 seconds ago  Up 44 seconds  0.0.0.0:1633->1433/tcp   adventureworks2019
It's running, and now you can connect to it using Azure Data Studio to verify that the database and data exist. Here is the connection info.
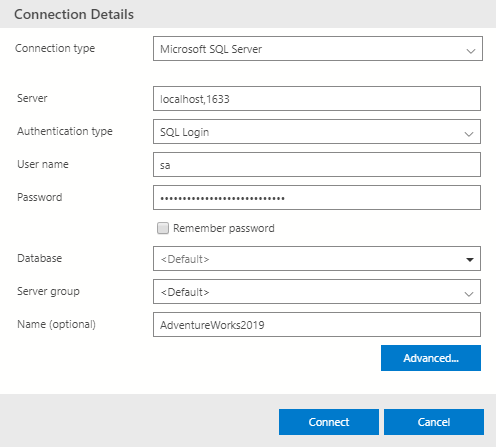
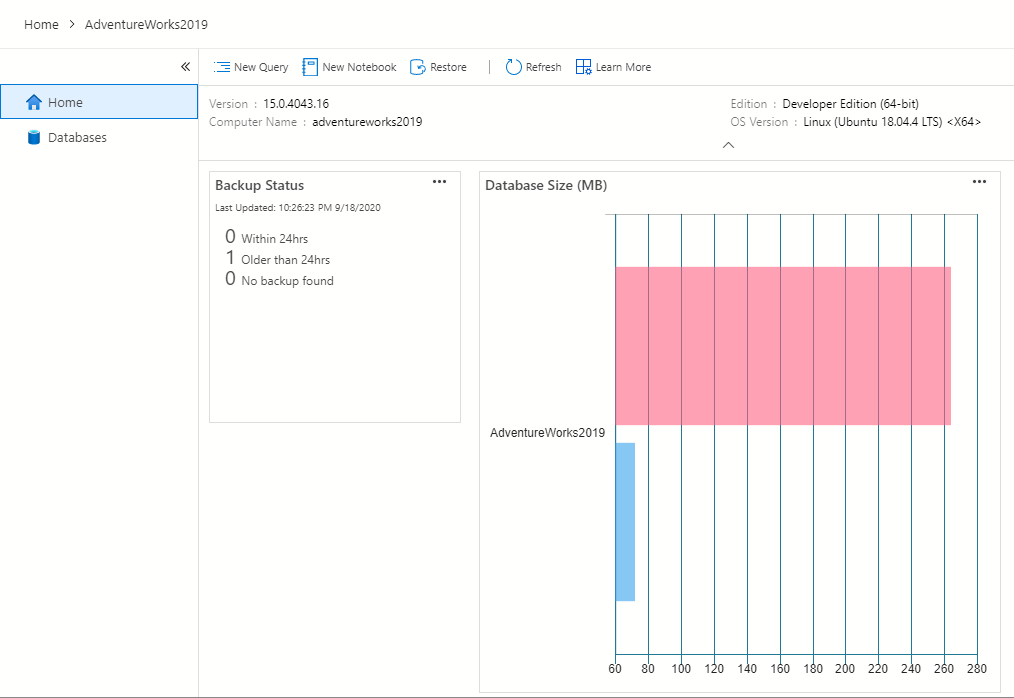
You should now be seeing the server's home screen that shows it is running on Linux and has the hostname set correctly.
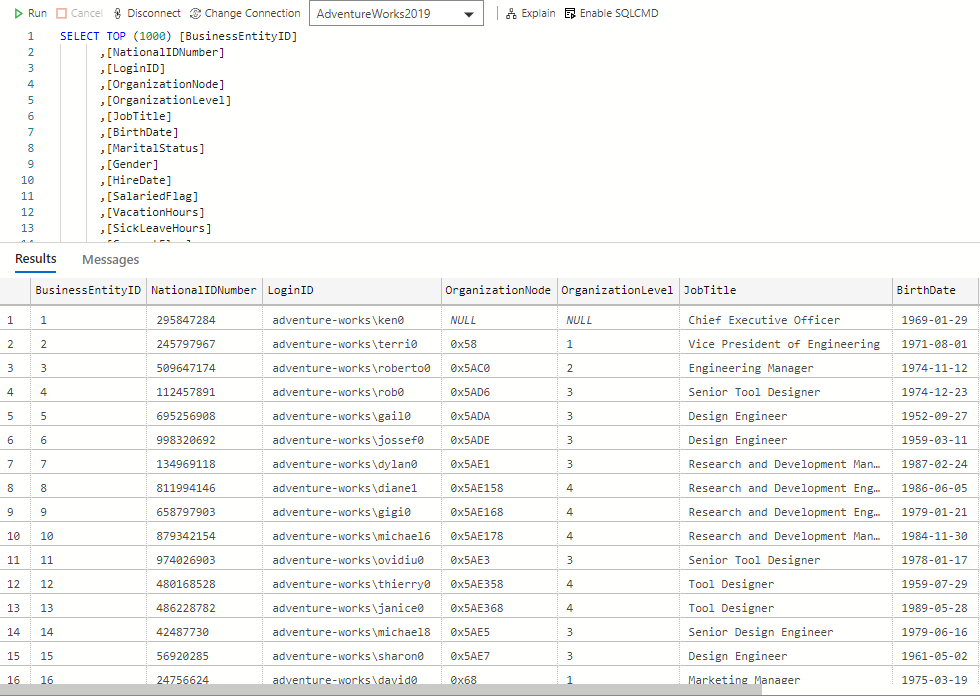
Finally, you can query some data to see that it all works properly.
Next Steps
Now that you know how to restore a database and create a new container with that database, you can take that back to your internal processes. I use these to have a fast, local database that is easy to start and stop. This approach can be leveraged to build databases for automated testing, testing schema migrations, testing your applications against newer versions of SQL Server, etc.
An Alternative Approach to Building the Container
Alternatively, you could just download the file directly from GitHub as part of the Dockerfile instead of copying it from your local filesystem. Here is an example doing just that. There are a few more steps required.
# Dockerfile
#
# Adventure Works Database on SQL Server 2019
FROM mcr.microsoft.com/mssql/server:2019-CU5-ubuntu-18.04

# Note: This isn't a secure password, and please don't use this for production.
ENV SA_PASSWORD=ThisIsAReallyCoolPassword123
ENV ACCEPT_EULA=Y

# Change to root user to run wget and move the file
USER root

RUN wget -progress=bar:force -q -O AdventureWorks2019.bak https://github.com/Microsoft/sql-server-samples/releases/download/adventureworks/AdventureWorks2019.bak \
   && chmod 777 AdventureWorks2019.bak \
   && mkdir /var/opt/mssql/backup \
   && cp AdventureWorks2019.bak /var/opt/mssql/backup/

# Change back to the mssql user to restore the database
USER mssql

# Launch SQL Server, confirm startup is complete, restore the database, then terminate SQL Server.
RUN ( /opt/mssql/bin/sqlservr & ) | grep -q "Service Broker manager has started" \
    && /opt/mssql-tools/bin/sqlcmd -S localhost -U SA -P ${SA_PASSWORD} -Q 'RESTORE DATABASE AdventureWorks2019 FROM DISK = "/var/opt/mssql/backup/AdventureWorks2019.bak" WITH MOVE "AdventureWorks2017" to "/var/opt/mssql/data/AdventureWorks2019.mdf", MOVE "AdventureWorks2017_Log" to "/var/opt/mssql/data/AdventureWorks2019_log.ldf", NOUNLOAD, STATS = 5' \
    && pkill sqlservr

CMD ["/opt/mssql/bin/sqlservr"]
This approach can be useful if your backups are available over a URL or you just want to hand a Dockerfile to someone.